Monday, September 22, 2014

Scratch Nail Wraps in "Herkimer Diamonds"

Hello, everyone! 

Today I have a quick post featuring some super unique nail wraps from Scratch, in collaboration with  Good Girl Jewelry for the September Monthly Mani Box. This collection has some really awesome wraps, so I was excited to get one of them on my nails. Here's "Herkimer Diamonds", a diamond and gold glitter design printed over clear, which could be worn alone or over any color you want. I chose to wear them over hunter green. I hope you like it! 


I love how this turned out, and apparently so did quite a few others! Numerous strangers looked at my nails, wondering what I had on them, proceeding to say they liked them. I thought it was so funny. They were definitely eye-catching. 

So, what do you think? I love how the wraps have gold glitter in them, so if you choose to layer them over a dark color, it can really be seen. See ya with a new post in a couple of days! 

- Tiff 


Tuesday, September 16, 2014

Scratch Nail Wraps in "Summer Serape"

Hello,everyone!


I have a super quick post to show you today, featuring some Mexican-inspired nail wraps from Scratch. They were inspired by Jenni of "I Spy DIY" blog, and her experience in Mexico. When I got my MMB (monthly mani box) with these, I immediately knew I wanted to put these on first. Here's "Summer Serape" in the pics below. 


How cute are these? I believe they are still available on Scratch's website if you're interested in wearing these. I don't think I've seen any nail wraps with this sort of design from any other company out there, so these are definitely unique! 

I'll try to post again this week, but due to the fact I've got my hands on a special little project at the moment, it might be in another couple of days. Maybe I'll post it here when it's all done! See ya later :) 

- Tiff 

Wednesday, September 10, 2014

Stripes and roses mani, grunge style

Hello, hello!

Today I have another roses and stripes mani to show you, with a different color scheme. I was in the mood for some darker colors, and it think they came out great together! I hope you do too. Check out the pics below. :) 


I painted on the grey polish, Bettina #197, which is my favorite grey polish in my stash (I just love the blue undertone). I then taped off my stripes using straight nail vinyls after the grey dried completely, then painted on a black creme; pulling off the vinyls right after. The blue roses were done by dabbing on a dark blue polish, and drawing in the detail with a turquoise nail art pen from Sally Hansen. This look is one of my favorite looks that I've done recently. Of course, roses and stripes always go great together. 

So what do you think? I see another color combo with this look coming up soon. See ya later! 


- Tiff 

Monday, September 8, 2014

My first (somewhat) successful water marble mani!

Hi!

A few days ago, I got the urge to once again try something that I just couldn't get right... The water marble mani. There are some people out there that make this look super easy, coming up with some amazing color combinations and water marble designs. Well, for some of us it's not so easy, and often times frustrating. My biggest trouble was getting the polishes to "swirl" or spread in water, which is definitely the most important part of the water marble process. 

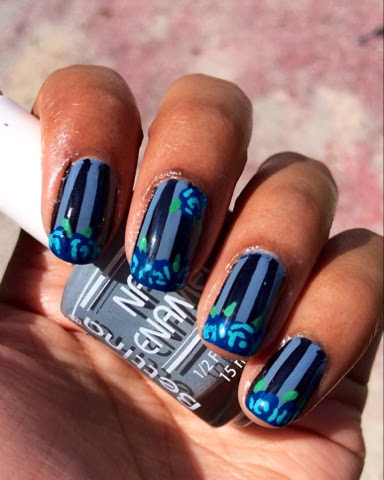
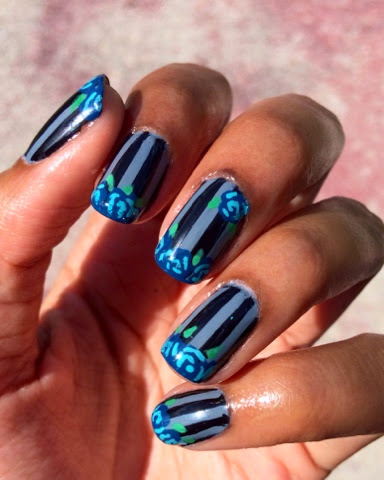
After a ton of failed attempts in the past year, I went on a limb one day and decided to play around with some Bettina colors again, and to my surprise, they swirled! I couldn't believe it... Finally! Lol! I immediately painted all of my nails with a white base polish, gathered everything I needed for a full water marble mani, and got to it! I wouldn't say it came out great, but it is definitely a huge step in the right direction for me! Check out the pics below!


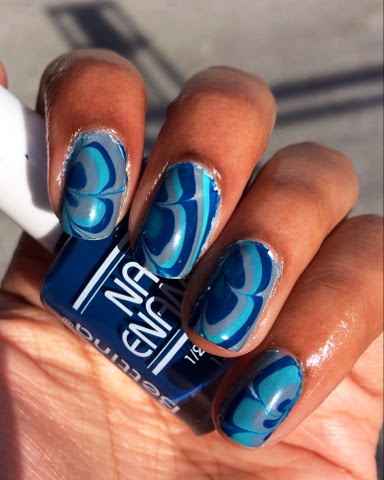
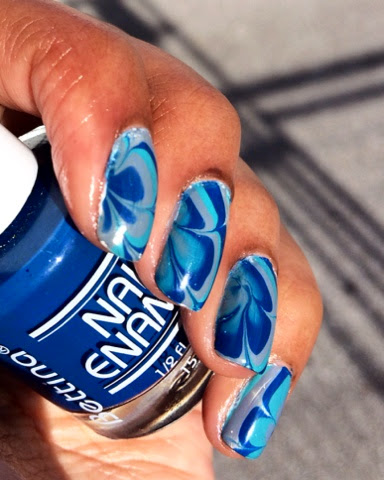
The major thing I learned this time around was what I might have been doing wrong all the other times I tried doing this. I realized I was dropping the nail polish in the water, expecting it to swirl easier that way, rather than allowing the brush of the polish to touch the surface of the water (making sure there was plenty of polish on the brush). That seemed to make a huge difference this time. Also, even though this last attempt was much more successful for me, there was still some trial and error involved. For example, I had to change the order of the polishes I put in the water from my spontaneous attempt, because they refused to swirl when I was ready to do my full manicure. How could the same order of colors work when I was playing around and then not work just an hour later when I was ready to do it for real? I still have no idea! After I switched up the color order and saw the colors consistently were swirling in the water before I went on to every nail, I didn't dwell on it too much. I was just wanting to get it done and finally be able to say I did it! 

Again, I wouldn't say this is an amazing water marble, but it certainly is a huge improvement. Water marbles take a lot of experimenting with colors, practice, and patience. I think watching as many tutorials as you can from as many different nail artists is sure to give you more ideas as to what you can do differently to lead you to a better experience of pulling this look off. Don't give up if you're struggling with it! I once thought I was done trying, only to finally get the results I got above; and I honestly think it'll only get better from here. 

I've heard that some of the best polishes to use for water marbling , and possibly the easiest to get (as they're available in drug stores like CVS and Walgreens) are from Sally Hansen and Bettina. Start playing around with those, if you haven't already. Good luck, and hang in there if you're currently having trouble mastering it! You'll get it, trust me! :))) 

- Tiff 


Wednesday, September 3, 2014

Floral water nail decals with nail art

Hi!

Happy Wednesday!

Today I have a look that I was inspired by Nina of Nina Nailed It to recreate. I applied some full coverage water nail decals from Daily Charme, and drew on some nail art with a white Sally Hansen nail art pen. I hope you like it! 


The water slide decals were really hard for me to put on. I'm not sure why I thought it would be as easy as applying nail polish appliqués are to me, but they definitely weren't. My biggest frustration is that they kept sliding off a bit, before they dried and stayed put. I made sure to apply all of the decals first before I drew on the designs, and sealed everything with top coat. I bought another set of these decals in another design, but I'm going to wait a bit before I put them on. This mani was way too much work for me! Lol. 

So what do you think? Have you tried full coverage decals before? See ya next time.

- Tiff 


Monday, September 1, 2014

Jenna Hipp "The New Brights" roses and stripes mani

Hello, hello!


I am really excited about this look I have on my blog today. This was my first time doing a rose mani, after I had been wanting to try it for quite some time! I thought it was going to be hard, but it was actually quite simple. Below you'll see some stripes and cute little roses using some of the 
"New Brights" from Jenna Hipp. I hope you like it as much as I do!


I used some straight nail vinyls to section off my stripes, after I painted two coats of "We Are Mint to Be" (let it completely dry first, of course). I then painted on "Ain't Life Grape", and immediately pulled away the tape while the polish was still wet. I then painted the rose shapes with "Just One Bite" and did the pink rose detailing with a pink Sally Hansen nail art pen. I got so many compliments on this look, I can't wait to recital this look again with different color combinations! 

You can pick up Jenna Hipp nail polish sets at Costco if you're a member, and online for members and non members. I absolutely love the formula they're made with and they are also quick drying. So, what do you think? I've been on a little bit of a floral kick lately, so I will actually have another flowery look or two for you this week. Stay tuned. :) 

-Tiff