Monday, April 13, 2015

Scratch "Lazy Pandas" nail wraps over NCLA nail polish in "Sweet Baby"

Hey there, everyone!

I'm finally able to take a moment to put a new post together for you. I did my nails right before bed last night, and just love how this mani came out. I decided to paint on a couple coats of Steph Stone's NCLA collab nail polish in "Sweet Baby" and layer some super cute panda bear nail wraps from Scratch on top. Check out the pics below! 


Cute, right? The nail wraps worked great as usual, but it had been a while since I've used an NCLA nail polish. I was happy to see how quickly each coat dried, and that I didn't have to wait too long to apply the nail wraps over it. I like to give the polish at least fifteen minutes to dry, but sometimes it can take a bit longer. The last thing you want is for the nail polish to smudge while you're applying nail wraps on top, so giving it a bit of time to dry is key. Follow up with a thin coat of top coat, and you're all set. 

So, what do you think about this look? I definitely plan on wearing this for a few days. See ya next time! :) 

- Tiff 


Monday, March 23, 2015

Scratch Nail Wraps in "All Seeing Eyes"

Hello,

I know it's been a long time since I've been able to write a blog post. I'm glad I got to squeeze in this post featuring one of my favorite nail wraps designs to date, from my favorite brand Scratch. I'm a monthly mani box subscriber as you all may know already, and their February box was designed with Audrey Kitching. Her designs are so funky and artistic, and they really speak to me. I've used all but one design from her collection, the "All Seeing Eyes", so here it is for you to see. This look definitely turned some heads! ;) 


At first, I was bit worried about how the nude base color would look on my skin tone, but I absolutely love it! I am planing on getting a backup set of these real soon :) 

What do you think about these nail wraps? Would you wear something like this? See ha with a new post later this week! 

-Tiff C 


Wednesday, March 11, 2015

NCLA with Steph Stone "Cute A.F." nail wraps

Hi!

I am finally getting around to writing a new post! This is a very busy time of the year at work, but it's probably better to keep moving than otherwise. Luckily, I've still been able to get in a mani every once in a while, and get a pic or two up on Instagram. Here we go...


So as you all know, I love nail wraps, but tend to stay away from the kind that are not made of nail polish. There's something about the sticker kind that do not cooperate with curved nail beds like mine; they wrinkle up on the sides, and don't lay completely flat (no bueno!). I did give a set of NCLA nail wraps a second try a while back, and it seemed like there was some hope with them. I just love the designs that this brand has, and if applied successfully, they make for an amazing look on the nail after a coat of your favorite shiny top coat. I took advantage of a "Just Because" sale that NCLA was offering over the weekend, and decided to grab Stephanie Stone's "Cute A.F." nail wraps, which have been on my wish list for weeks. Check out the pics below! :)


When I first used NCLA nailw wraps a couple of years ago, the wraps were a little on the thick side, and not very pliable. I'm happy to see that they have made an improvement with the flexibility so that people with curved nail beds can wear them much easier now! Out of all of the nail wraps that I've tried that are not made of nail polish, I would say that the NCLA kind are the most curved nail bed-friendly out there.

Thanks for checking out this post! See ya next time :)

- Tiff

Wednesday, February 11, 2015

Incoco Nail Polish Strips in "Spring Fling"


Hi! 


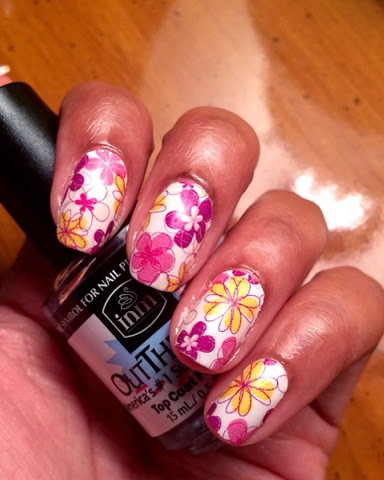
I had a great, relaxing week at my grandparents' house, and now it's back to my usual Miami city life. I put on these super cute floral nail polish strips from Incoco, one of my favorite nail appliques brands. Check out the photos below of the design called "Spring Fling". 


As usual, I start out with my favorite base coat (Top 2 Bottom by Orly) and finish off with Out The Door from INM; which you see me holding in the photos. This combo has been working for me for so long, and it keeps my manis together long enough while I'm in between looks. 

So, I know it's still super cold in quite a few of the states right now, and we've been in what we consider cold weather here in Miami too! LOL...  ;) ... Anyways, flowers always brighten up any mood brought on by chilly or cold temps, hence the reason for me applying these "Spring Fling" nail appliques. How do you feel about these? Are you as big of an Incoco fan as I am? See ya next time! Maybe I'll be able to pull off a Valentine's Day look before the week is over :) 

- Tiff C 


Tuesday, February 3, 2015

OMG Nail Strips "Kapowski" with pictorial

Hi!

I'm away for the week at my grandparents' house, and decided to put together a new post featuring a little how-to. The folks over at OMG Nail Strips were kind enough to send me a couple of nail strips designs to review for you guys, so here we go...

I am pretty much following the instructions that are given on the back of each pack of nail strips, with a bit of the techniques I've become accustomed to over the years on my own. This is only my second pictorial so I hope it is easy to follow along. Check out the how-to below, and the super cute design called "Kapowski".


I like to use a base coat every time I give myself a manicure, even with nail trips. As you see in step 1, I am applying my favorite (Orly top 2 bottom), and letting it dry before I continue.
 
 As far as the tools I use, I always feel that an orange stick and cuticle nippers are your best friends when applying nail strips. The orange stick helps to flatten out any wrinkles you have (as you see me doing in step 3). The instructions on the back of the package suggest trimming the nail strip down to size if needed. I love cuticle cutters like the one you see above because they allow for an easy grip and a non obstructed view to your nail while you're working with them. I like to trim them down on both sides of the nail wall after I've used an orange stick to flatten it out as best as possible (skip ahead to step 4 if this isn't needed for you). I also like to trim the free end down  bit before filing off the excess on the edge to better ensure that I won't file off too much. Make sure you're filing in a downward motion, and gently! ;)
 
Step 5 might seem  little off, but I wanted to try something that the guys from OMG used to suggest from the beginning, and that's going over the nail strip with a bit of acetone. I used to stay away from this step when I used these nail strips previously, because I was worried about wiping off some of the color. I decided to try it by using regular everyday nail polish remover (not the pure acetone type), and using a q-tip to swipe a little bit over the nail strip. It is believed that this will help the nail strip flatten out and adhere to the nail better, and from what I can see, it does help. I don't think this step is a must, as I use nail strips all the time, and never do this. I'll just say that it's completely up to you! Finish off your mani with your favorite top coat to seal everything in.


So, what do you think? I love the color combinations and this geometric pattern. I plan on keeping this on for the rest of my trip!
 
If you like what you saw today, check out OMG Nail Strips here. They are currently offering a 5 for $25 promotion with the code "5pack", and a 10 for $45 with the code "10pack". OMG Nail Strips are also on Etsy too! I recommend you check them out, as this is my second time using their product, and I really am pleased. See ya when I get back to Miami next week! :)
 
- Tiff


Thursday, January 22, 2015

Haim Nails

Hi!

Today I have a quick post to show you. Yesterday I quickly thought up an idea for a colorful mani using some Haim nail decals by Sara M Lyons for Emerging Thoughts. I did a somewhat tie dye effect by sponging on some pastel colors over white. I thought the hippie feel would go great with the Haim decals! Check out the pics below :) 


This might not be the neatest sponging job, but I do still like how it came out overall. I really need to get on the liquid palisade bandwagon... I hear that stuff saves lives when it comes to nail art! Haha ;) 

So what do you think about this look? Do you like any songs from the Haim sisters? See ya next time! 

- Tiff 


Wednesday, January 14, 2015

Sara M Lyons Tv Party Nail prints


Hello, everyone!

I managed to squeeze in one more manicure before my long work week takes off. Given that I love Sara M Lyons nail art decals, and needed something that would last on my nails for a bit, I thought going with her full coverage nail prints would work the best. I know you guys just saw some of her decals in my post from Monday, but there's something about her quirky designs that just make me happy to look at my nails constantly, and show them off to others...lol ;) So, I have some "TV Party" nails to show you. Check out the pics below.


As recommended, I painted my nails with a coat of white polish before hand, so that the decals could pop more once applied. You put these on just as you would apply any water slide decals. The only difference is that they are full coverage, like nail wraps.Once you've applied the nail prints, just seal with your favorite top coat, and you're good to go! I absolutely love how these came out!

Take a look at Sara's fun and quirky nail art goodies here, if you're wanting to try out her nail decals your self. I'll see you guys next week after I make it through this week at work. When I get a chance, I'll be thinking about what I'm going to show you next! See ya :)

- Tiff C

Monday, January 12, 2015

Totally 90's nail decals manicure

Hello, everyone!


Today I have this super fun manicure to show you. I loved the Spice Girls growing up (what 90s kid didn't?), and freaked when I saw these nail art decals from Emerging Thoughts and Sara M Lyons (Remember my Britney and Justin post?) I imagined the look in my head for a bit, and felt it would be cute to add the MTV and Yin Yang decals together for this look. Check out the pics below! 


The polish you see underneath the decals is Sinful Colors "Skylark". I feel like it looks much lighter in the bottle than it does on the nail, but that's ok. Decals work best over white nail polish, as suggested, but any light pastel shade will do. The stripes were done with some Sally Hansen striper polishes from their I Heart Nail Art line. I'm trying to get more comfortable with striper brushes, so I think basic stripes are a good place to start. I've been an artist my whole life (acrylic paint and drawing), but there's something about illustrating on nails that I'm still trying to work on...I'll get there! ;)

So, fellow 90s kids... what do you think? I always love how people pay tribute to what I feel was one of the best decades ever, and these "Totally 90s" decals definitely do that. I try to remember those good old days as much as possible, and I got so many compliments on this look. I hope you like it too!I'll have a new post up soon, once I get through this very busy work week I have ahead of me. Wish me luck!

- Tiff


Wednesday, January 7, 2015

Nail art stripes mani

Hi, everyone!

This is my first post of 2015!

I was inspired by another nail blogger I follow on Instagram (Lovelymugglenails) to recreate a stripes mani in a different color combination. Check out the pics below... I really like how it turned out :) 


The beautiful grey polish is "Intelligence, Integrity, & Courage" from China Glaze's The Giver collection, and the stripes were free-handed by using all five of the colors included in The New Black's "Digital Underground" set (I was lucky enough to find this set on clearance for only $7 at TJ Maxx!). 

So, what do you think? I actually made a New Years resolution this time, and I decided that I will work more on my free-handed nail art skills. It's going to be a challenge, but I'm looking forward to it! I'll see you later with a new look :) Happy New Year! 

- Tiff


Monday, December 29, 2014

Britney and Justin nail decals mani

Hi!


You may not have seen me here for a while, but I have been posting some manis on my Instagram and facebook page so... I wasn't completely away! 

Today I have a super cute mani featuring some more nail decals from one of my faves, Sara M Lyons, that she made for the online shop Emerging Thoughts. She did a 90s themed set of decals which has illustrations of many memorable moments from that decade. Being a 90s kid myself, I had to order these, and combine the Britney Spears and Justin Timberlake ones together for this mani you're about to see... It only makes sense, right? 


I absolutely love how this came out! I decided to try to work on my free-handed nail art skills on my thumb nail, and pull the whole look together. In case you want to order these nail decals, the Britney and Justin ones are part of the "Totally 90s" nail decal set sold on Emerging Thoughts, and the hearts are from the "3 Bad Kitties" pack found on Sara's website.  

So, what do you think about this look? Does it take you down memory lane a bit? It did for me! See ya next time! 

- Tiff 

Thursday, December 18, 2014

Sephora Formula X Ugly Holiday Sweater nail appliqués

Hi, everyone!

Today I have some super cute nail polish appliques from Sephora perfect for this time of the year. This is also my first holiday-themed mani (I know...I'm late to the party). During one of my last trips to Sephora, I browsed through the sale section and found this set of two designs of appliqués for only $5... It was too much of a deal to leave the store without. Check out the cute ugly holiday sweater 
-inspired design in the pics below. 


I absolutely love these. They are made from real nail polish, which is always a win with me. These are so festive, and perfect for any holiday party. 

I can't believe thi is my first holiday mani so far... I will have to try to get some more in, for sure! See ya next time :) 

-Tiff 


Monday, December 15, 2014

Sally Hansen "Mint Tint"

Hello, everyone! 

I have a super quick post to show you today. Remember that I recently picked up some nail goodies that are on sale at CVS? Well, here's another one of the products I picked up that day from Sally Hansen. Here's one of their textured polishes in "Mint Tint". 


I wish the camera picked up the shimmer that you can kind of see in the bottle, but not so much on my nails. I used two coats of this polish, that evened out just how you see it above by the second coat. When I grabbed this one, it was marked at 75% off, so I thought it was a good textured polish to add to my collection for the price. Another color from the Sugar Shimmer line that I like is "Sugar Cloud", a light blue that has more obvious shimmer on the nail. 

So what do you think about this one? I love a pretty mint green color any time of the year. 
See ya next time :) 


- Tiff 

Monday, December 8, 2014

Incoco Nail appliqués in "Bonfire Nights"

Hello! 

Today I have a quick post featuring some cute tribal Incoco nail polish strips. I took advantage of their Black Friday sale and picked up some designs that I had been wanting for quite some time. Check out "Bonfire Nights" in the pictures below! 


I know we're in the holiday season now, but I just wanted to pull out one more look that reminded me of lazy Fall nights. And besides, tribal will always win in my book... Anytime of the year :)

So, how do you feel about these? Are you in full holiday mode with your nails yet? See ya with a new post soon! 

- Tiff C 


Thursday, December 4, 2014

Sara M Lyons Nail Prints in "Happy Meal"


Hello, everyone! 

I have a super cute nail look to show you today. You all know I recently discovered artist Sara M Lyons and became a huge fan of her nail decals. Today I have some full coverage decals to show you in a super cute burger and fries print. Check out how these nail prints came out on me in the pics below. 


How you use these nail prints is actually quite simple. You cut out the right nail shape you need, place the decal on your nail (there is adhesive on them, so they stay right where you place them), submerge in water, and lift the paper backing away. I tried using full coverage decals before, and I had some trouble keeping them from sliding off after dipping them in water. The fact that Sara's have a sticky side to them really made applying these unbelievably simple. I absolutely love how these came out, and the burger and fries look so cute! It is recommended to wear these over a light colored polish, so I painted on a generous coat of my favorite white polish (Sinful Colors "Snow Me White"), and was ready to go. Finish the mani off with top coat, and you'll be ready to turn heads with these super cute prints! Sara has a handful of prints to choose from, and you're sure to see more of them on me in the future. 

So, what do you think of these? Food-themed nails are very popular right now and make for a fun look. See ya next time :)

- Tiff C  


Tuesday, December 2, 2014

Sally Hansen Salon Effects in "Disk-O-Queen"

Hello!

I have a really quick post for you today. During one of my latest trips to CVS, I noticed there was a considerable amount of beauty products on sale, and I decided to go for my go-to Sally Hansen Salon Effects nail polish appliqués. I picked up a couple, including "Disk-O-Queen", which you'll see in the pictures below. 


I filtered the pictures a bit so the shine from the glitter could be more visible. As you can probably see, the  glitter is very spread out, making my nail a bit visible underneath. This is probably the most sheer nail appliqué I've used from Sally Hansen, but I think it ended up looking quite nice overall. What do you think? 

I have some really fun looks coming up on the blog soon, and I can't wait to show you all! I'll see you with my next post later this week! 

- Tiff C 


Thursday, November 27, 2014

China Glaze Cherry Blossom Appliqués nail art


Hi!

Today I have a mani that I came up with rather spontaneously. I had some left over China Glaze nail appliqués and I decided to put them to use. Using some nail vinyls from Miami Hand Jobs, I decided to make a somewhat rustic look, given the fall season we're in. Take a look at the pics below to see what im talking about! 


I ended up having mixed feelings about this look. One side of me feels it doesn't look bad, and the other half of me wishes I had used a brown underneath the cherry blossom print instead of the reddish orange. This is one of those situations where it looked better in my head than it does in real life! It happens! I've got plenty more nail appliqués from China Glaze (which happen to have a great shelf life) to play with and create better looks like this. Trial and error...

Well, I hope you have a good Thanksgiving, if you celebrate it, and enjoy the rest of the week! See ha next time! 

- Tiff 


Tuesday, November 25, 2014

Scratch Nail Wraps in"Animal Party"

Hi everyone!

The weather here in Miami has just been the worst. It has been cold, and rainy, which means I haven't been able to go for my long jogs that I love to do every once in a while. I knew I wanted to put some golohraphic nail polish on my nails, but the lack of sun here lately made me worry about not being able to capture the effect of them in photos. Luckily there is a way of getting around lack of sunlight if you're like me, and don't have a light box like many other nail bloggers do. I went into a room, turned off the light, and used the flash on my phone camera to snap the pics you'll see below. I think it captured the hologram effect just fine! Check out the look I used combining holographic polish with Scratch nail wraps in "Animal Party". 


See? No sun, no problem! The grey holo, which photographed more on the blue side, is Jade "Extasy", and the brown holo is Hits "Morfeu". I believe you can still get these from Llarowe; I got ordered mine some time last year. As usual, Scratch's clear nail,wraps are a win for me, because they allow you to layer them over any kind of nail polish you want! 

So, how do you feel about these animal wraps? I think with the exception of the raccoon and frog faces that came in the set (I chose not to use those because I'm terrified of frogs and raccoons!) theyre very cute! See ya next time! 

- Tiff 


Friday, November 21, 2014

Scratch nail wraps in "What Lifts You"

Hi!

I have a really cool look to show you today. I went to a concert with my mom this past weekend, and I decided to put on some nail wraps from Scratch's latest monthly mani box for November, created with artist Kelsey Montague. I was also in the mood for some sparkles, so I added INM's Northern Lights hologram top coat to them, and I love how they looked. Check out the pics below! 


I filtered the pics a bit to try to capture the holographic glitters from the top coat. It's a bit hard to get the glitter to show in pictures, just as you see in person ...


Wednesday, November 19, 2014

Sara M Lyons Cats & Crosses and Cute & Sleazy nail decals

Hello!

We're half way through the week! 

I am really excited to show you this look I have today. I discovered artist Sara M Lyons on Instagram, and immediately became a fan. I first saw her 90s inspired nail decals (which I'll have here soon) and then decided to check out her Etsy shop and get a couple of nail goodies from her there. I decided to grab some of her faulty nail decal sets (the errors are hardly noticeable) because this was first time trying them out, and they were available at a discounted price. I love cats, so I went with her "Cats and Crosses" and "Cute and Sleazy" design packs. I used them both to create the look you'll see in the pics below, and I love how it came out!


What I love about Sara's decals besides the illustrations themselves, is the fact that they have adhesive on them, so all you have to do is cut out the decal you want to use, place it on your nail, and submerge the nail in water; the paper backing slides off after a few seconds. Sometimes the hardest thing about using nail decals is placing and keeping them in the exact spot you want them, but these make that so much easier. It is suggested, as with most decals, that you wear them over light colors or pastels, so you can see the images clearer. The polishes I used are Zoya "Kristen" (thumb nail), and "Throwing Shade", and "Life is But A Cream" from Jenna Hipp. 

So, what do you think? I love Sara's illustrations so much; she definitely has a new fan over here! She also makes me want to put my drawing skills to work and create my own nail decals. Stay tuned, we'll see how that goes. I think you should support artists like her, and many others out there. Check out Etsy and see what cool things you can find. Thanks for taking a look today!

- Tiff 


Monday, November 17, 2014

Virtuous Polish in "Patience" plus Incoco "High Voltage"

Hi!

Today I have a new bright-colored look to show you, featuring a polish from a brand I first introduced you to in my Blogaversary post a couple of weeks ago.Virtuous Polish is an indie brand that offers highly pigmented matte polishes that are sure to make a bold statement on your nails.I decided to create a look with one of their polishes in "Patience" with some left over nail appliques from Incoco. There's lots of fluorescent and matte action going on in the pics below! ;)


"Patience" is insanely pretty isn't it? I mattified the Incoco applique accent ("High Voltage" design) using "Matte Magic" from China Glaze. Unfortunately, highly pigmented matte nail polishes tend to not last for more than a day... I had major chips after about 24-hour wear with both polishes. I cannot explain the science about it, but for some reason, the more pigmented a matte polish is, the more prone it will be to chipping. If you've used matte polishes from Zoya and OPI, they mention that their mattes are not meant to be worn for more than that amount of time. The only matte polishes I know of that last quite long for them being matte are the ones from ManGlaze, but again, those aren't as pigmented as the ones I mentioned before. They're great polishes, I have a good handful of them, but the colors aren't as bold as the ones from Zoya and Virtuous Polish. I guess you have to figure out what you want before you put your mani together: a matte look that will last for more than a day, or a matte look just for a special night out.

Overall, I would absolutely order more from Virtuous Polish in the future because they make matte polishes in colors that I have not seen done yet, including a bright yellow. Also their prices are very reasonable, and their customer service team is the best. I say if you are wanting bright, bold matte polishes for a night out on the town or a party, definitely go for these.

So, what do you think about this look? I know most people feel colors this bright should be saved for the spring and summer, but I like to wear brights all year round; as I live Miami and that seems to be acceptable! ;)See ya next time.

- Tiff