Monday, April 13, 2015

Scratch "Lazy Pandas" nail wraps over NCLA nail polish in "Sweet Baby"

Hey there, everyone!

I'm finally able to take a moment to put a new post together for you. I did my nails right before bed last night, and just love how this mani came out. I decided to paint on a couple coats of Steph Stone's NCLA collab nail polish in "Sweet Baby" and layer some super cute panda bear nail wraps from Scratch on top. Check out the pics below! 


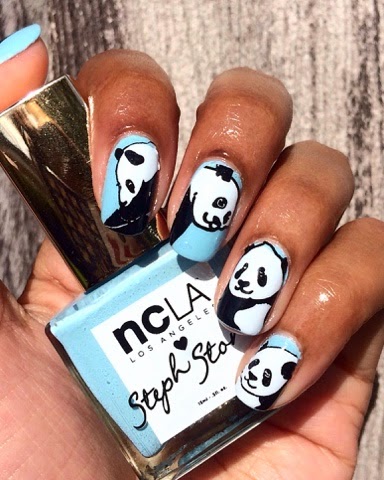
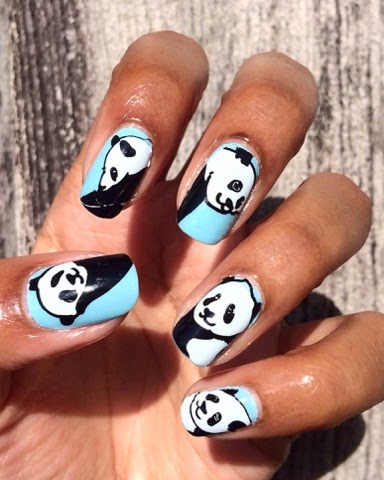
Cute, right? The nail wraps worked great as usual, but it had been a while since I've used an NCLA nail polish. I was happy to see how quickly each coat dried, and that I didn't have to wait too long to apply the nail wraps over it. I like to give the polish at least fifteen minutes to dry, but sometimes it can take a bit longer. The last thing you want is for the nail polish to smudge while you're applying nail wraps on top, so giving it a bit of time to dry is key. Follow up with a thin coat of top coat, and you're all set. 

So, what do you think about this look? I definitely plan on wearing this for a few days. See ya next time! :) 

- Tiff 


Monday, March 23, 2015

Scratch Nail Wraps in "All Seeing Eyes"

Hello,

I know it's been a long time since I've been able to write a blog post. I'm glad I got to squeeze in this post featuring one of my favorite nail wraps designs to date, from my favorite brand Scratch. I'm a monthly mani box subscriber as you all may know already, and their February box was designed with Audrey Kitching. Her designs are so funky and artistic, and they really speak to me. I've used all but one design from her collection, the "All Seeing Eyes", so here it is for you to see. This look definitely turned some heads! ;) 


At first, I was bit worried about how the nude base color would look on my skin tone, but I absolutely love it! I am planing on getting a backup set of these real soon :) 

What do you think about these nail wraps? Would you wear something like this? See ha with a new post later this week! 

-Tiff C 


Wednesday, March 11, 2015

NCLA with Steph Stone "Cute A.F." nail wraps

Hi!

I am finally getting around to writing a new post! This is a very busy time of the year at work, but it's probably better to keep moving than otherwise. Luckily, I've still been able to get in a mani every once in a while, and get a pic or two up on Instagram. Here we go...


So as you all know, I love nail wraps, but tend to stay away from the kind that are not made of nail polish. There's something about the sticker kind that do not cooperate with curved nail beds like mine; they wrinkle up on the sides, and don't lay completely flat (no bueno!). I did give a set of NCLA nail wraps a second try a while back, and it seemed like there was some hope with them. I just love the designs that this brand has, and if applied successfully, they make for an amazing look on the nail after a coat of your favorite shiny top coat. I took advantage of a "Just Because" sale that NCLA was offering over the weekend, and decided to grab Stephanie Stone's "Cute A.F." nail wraps, which have been on my wish list for weeks. Check out the pics below! :)


When I first used NCLA nailw wraps a couple of years ago, the wraps were a little on the thick side, and not very pliable. I'm happy to see that they have made an improvement with the flexibility so that people with curved nail beds can wear them much easier now! Out of all of the nail wraps that I've tried that are not made of nail polish, I would say that the NCLA kind are the most curved nail bed-friendly out there.

Thanks for checking out this post! See ya next time :)

- Tiff

Wednesday, February 11, 2015

Incoco Nail Polish Strips in "Spring Fling"


Hi! 


I had a great, relaxing week at my grandparents' house, and now it's back to my usual Miami city life. I put on these super cute floral nail polish strips from Incoco, one of my favorite nail appliques brands. Check out the photos below of the design called "Spring Fling". 


As usual, I start out with my favorite base coat (Top 2 Bottom by Orly) and finish off with Out The Door from INM; which you see me holding in the photos. This combo has been working for me for so long, and it keeps my manis together long enough while I'm in between looks. 

So, I know it's still super cold in quite a few of the states right now, and we've been in what we consider cold weather here in Miami too! LOL...  ;) ... Anyways, flowers always brighten up any mood brought on by chilly or cold temps, hence the reason for me applying these "Spring Fling" nail appliques. How do you feel about these? Are you as big of an Incoco fan as I am? See ya next time! Maybe I'll be able to pull off a Valentine's Day look before the week is over :) 

- Tiff C 


Tuesday, February 3, 2015

OMG Nail Strips "Kapowski" with pictorial

Hi!

I'm away for the week at my grandparents' house, and decided to put together a new post featuring a little how-to. The folks over at OMG Nail Strips were kind enough to send me a couple of nail strips designs to review for you guys, so here we go...

I am pretty much following the instructions that are given on the back of each pack of nail strips, with a bit of the techniques I've become accustomed to over the years on my own. This is only my second pictorial so I hope it is easy to follow along. Check out the how-to below, and the super cute design called "Kapowski".


I like to use a base coat every time I give myself a manicure, even with nail trips. As you see in step 1, I am applying my favorite (Orly top 2 bottom), and letting it dry before I continue.
 
 As far as the tools I use, I always feel that an orange stick and cuticle nippers are your best friends when applying nail strips. The orange stick helps to flatten out any wrinkles you have (as you see me doing in step 3). The instructions on the back of the package suggest trimming the nail strip down to size if needed. I love cuticle cutters like the one you see above because they allow for an easy grip and a non obstructed view to your nail while you're working with them. I like to trim them down on both sides of the nail wall after I've used an orange stick to flatten it out as best as possible (skip ahead to step 4 if this isn't needed for you). I also like to trim the free end down  bit before filing off the excess on the edge to better ensure that I won't file off too much. Make sure you're filing in a downward motion, and gently! ;)
 
Step 5 might seem  little off, but I wanted to try something that the guys from OMG used to suggest from the beginning, and that's going over the nail strip with a bit of acetone. I used to stay away from this step when I used these nail strips previously, because I was worried about wiping off some of the color. I decided to try it by using regular everyday nail polish remover (not the pure acetone type), and using a q-tip to swipe a little bit over the nail strip. It is believed that this will help the nail strip flatten out and adhere to the nail better, and from what I can see, it does help. I don't think this step is a must, as I use nail strips all the time, and never do this. I'll just say that it's completely up to you! Finish off your mani with your favorite top coat to seal everything in.


So, what do you think? I love the color combinations and this geometric pattern. I plan on keeping this on for the rest of my trip!
 
If you like what you saw today, check out OMG Nail Strips here. They are currently offering a 5 for $25 promotion with the code "5pack", and a 10 for $45 with the code "10pack". OMG Nail Strips are also on Etsy too! I recommend you check them out, as this is my second time using their product, and I really am pleased. See ya when I get back to Miami next week! :)
 
- Tiff


Thursday, January 22, 2015

Haim Nails

Hi!

Today I have a quick post to show you. Yesterday I quickly thought up an idea for a colorful mani using some Haim nail decals by Sara M Lyons for Emerging Thoughts. I did a somewhat tie dye effect by sponging on some pastel colors over white. I thought the hippie feel would go great with the Haim decals! Check out the pics below :) 


This might not be the neatest sponging job, but I do still like how it came out overall. I really need to get on the liquid palisade bandwagon... I hear that stuff saves lives when it comes to nail art! Haha ;) 

So what do you think about this look? Do you like any songs from the Haim sisters? See ya next time! 

- Tiff 


Wednesday, January 14, 2015

Sara M Lyons Tv Party Nail prints


Hello, everyone!

I managed to squeeze in one more manicure before my long work week takes off. Given that I love Sara M Lyons nail art decals, and needed something that would last on my nails for a bit, I thought going with her full coverage nail prints would work the best. I know you guys just saw some of her decals in my post from Monday, but there's something about her quirky designs that just make me happy to look at my nails constantly, and show them off to others...lol ;) So, I have some "TV Party" nails to show you. Check out the pics below.


As recommended, I painted my nails with a coat of white polish before hand, so that the decals could pop more once applied. You put these on just as you would apply any water slide decals. The only difference is that they are full coverage, like nail wraps.Once you've applied the nail prints, just seal with your favorite top coat, and you're good to go! I absolutely love how these came out!

Take a look at Sara's fun and quirky nail art goodies here, if you're wanting to try out her nail decals your self. I'll see you guys next week after I make it through this week at work. When I get a chance, I'll be thinking about what I'm going to show you next! See ya :)

- Tiff C